Wednesday, 29 April 2009
Drink-Safe Systems Aquaguard Eliminator
I've been using an Aquagear bottle from Drink-Safe Systems since last year and while it works well I found the capacity a little small for camping. I carried an Ortleib flexible water bag for camp use and usually filled it from the Aquagear bottle as late in the day as I dared but found it a bit troublesome trying to keep the Ortleib bag open and operate the Aquagear bottle. The other problem I had was that none of my rucksacks have bottle pockets that are accessible without removing the pack so that had me looking at flexible bladders/in pack hydration systems.
I'd seen the inline filters before so went to have another look and found the Eliminator Inline filter. What attracted me to it was the Q/D fitting for the filter which allows you to remove the filter from the system. The RRP is £46.95 but is currently available at a Launch offer price of £36.95.
After a few e-mails to Giles (Butler) of Drink-Safe Systems I placed my order and received the kit next day. I can recommend the service 100%, prompt replies to questions and prompt delivery.
The kit comes with 2 x Q/D fittings which are screwed into the filter housing, 4 x Screw in non Q/D fittings (2 different sizes) the Filter unit, instructions and an adapter which screws into the filter to allow you to;
a. Back Flush the Filter to maintain it
b. Attach the filter to a standard water tap to directly filter water.
Setting up the system is simplicity itself, it's fairly obvious and you could hardly go wrong but it does come with detailed instructions.
The first thing I did was to decide where to fit the filter on the feed tube, I decided to place mine mid way so that the filter was close to the feed tube port on the rucksack, this means you don't need to try to push both the bladder and filter down into a fully loaded rucksack, also if you want to use the filter as a gravity feed to fill a mug or pot you can unclip the feed tube at the outlet end of the filter thereby removing the bite valve and still have enough length left on the feed tube to allow it to hang outside the rucksack.
The next step was to flush the filter before fitting. To do this you attach one of the non-Q/D connectors to the Tap Adapter, screw the adapter to the filter taking care to screw it into the input end (there's a direction of flow arrow on the filter housing) attach it to a tap and flush it through, the instruction suggest flushing for 1 minute.
With the filter flushed it's time to fit the Q/D fittings, simply push the barbed section into the feed tube, unscrew the tap adapter and screw the Q/D fittings into the filter, (if you separate the 2 parts of the Q/D fittings prior to fitting to the feed tube/filter make sure that you match them properly so that the filter when connected is correctly orientated to the direction of flow. Once you've done that you're ready to roll.
The filter can be removed from the feed tube if not required, as the fittings are matched the feed tube can be joined clipped back together.
A couple of things I want to mention though:
a. The Q/D connectors aren't valved (sometimes known as 'Dry Break') which means that water can flow out of the feed tube if the filter is disconnected, with care this isn't too much of a problem.
b. The barbed end of the Q/D connector measures approx 7.5mm, I've tried them on a Camelbak Feed Tube and a Source Convertube feed tube and they fitted fine, some systems may have a feed tube with in ID greater than those mentioned so it's worth checking. In the event that your feed tube isn't a tight fit on the Q/D connectors a bit of PTFE (Plumbers) tape should sort it, if not you can always use the non Q/D fittings but with a little loss of usability.
All in all a nice system that's a bit easier to use IMO if you're going out for more than a 1 nighter. I'll probably still use the Aquagear bottle for day walks.
The Filter and Q/D connectors add about 100g to your existing Hydration system.
Full details of the various tests performed on the Drink-Safe Filtration Systems can be viewed Here
Wednesday, 22 April 2009
Phoenix Phreeranger
Probably the best solo tent in the world?
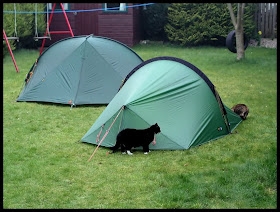
The Phreeranger (and Phreerunner) were single hoop solo (sometimes classed as 1+) tents made from around 1985 to about 1995, they also used a short transverse pole at the apex of the fly to enhance headroom. I have an 88/89 Field & Trek catalogue which lists the Phreeranger with no mention that it's a 'new' model, the last Field & Trek catalogue that I can find it listed in is the 1995 issue. The price in 1988/89was £169.95, when I bought mine it was around £190, by 1995 it had risen to £231. For comparison a Wild Country Quasar cost £224 - 1998, £245 approx - 1990 and £334 - 1995. The other iconic solo tent which fortunately is still around was the Saunders Spacepacker which cost £197 - 1988, not sure about the cost in 1990 and 1995 but the current top of the range Spacepacker costs £269.
Phoenix Phreeranger EB
I bought my 1st Phreeranger, pictured above, around 90-92, an EB model to be exact which simply meant 'Extended Bell' The difference between it and the standard Phreeranger/Phreerunner was the style of door. Instead of the 'Bell' (porch) tapering into a point with a single zip the porch was squared off and had 2 zips which meant that the door could be opened by rolling up the center section or either of the end quarters. In addition as the zips were double ended the center section could be opened from the top down. The EB also had a hood at the top of the door enabling you to leave the top few inches unzipped. The single skin Phreerunner was also available in an EB version and is listed in the 1990 Phoenix catalogue, both the Phreeranger EB and Phreerunner EB are listed as new for 1990.
I sold my Phreeranger EB 3 years ago and have regretted it since but recently managed to aquire a Phreeranger standard, the one shown at the top of the page. This is an older model, pre 1988 as the Flysheet doesn't have taped seams while my other one did. The 1990 Phoenix catalogue states regarding flysheet fabric that
Quote SUPALITE: used for the first time in '88 a new soft P.U. coating 1.5oz ripstop which is tapable - permits lightness with incredible strength. 80cm minimum hydrostatic head.
The Phreeranger like all Phoenix tents was highly specced, the poles were made by Hampton Works from 7075 alloy and labelled 'Bulldog', the supplied pegs were v section HS30 alloy (the pegs were so tough that I actually kept mine when I sold the Phreeranger). The guylines while thick compared to todays guys were pretty lightweight at the time being about 2.5mm dia.
My original '90 ish model came supplied with:
1 x Large Stuff Sack
2 x Small Stuff sacks (one for Inner, one for Fly)
1 x Repair kit including a pole repair section
13 x V pegs c/w stuff sack
2 x Poles (main and cross pole) c/w stuff sack
The 9 flysheet pegging points were 15mm approx webbing with a ring attached, also attached to the ring was a short length of 2-2.5mm shockcord which had a plastic 'S' hook attached, the inner tent attached to the fly using 2-2.5mm shockcord hooked onto the 'S' hooks. In addition to the 9 pegging points there were 9 guylines, 3 attached to the pole sleeve at each end and 3 across the back of the tent.
The inner tent on my original EB model had a full mesh door and a full plain door as far as I can remember, certainly there was at the very least a half mesh panel in the door with a plain section to close off the mesh. The one I have now which is an older version only has a 1 piece plain door. The inner tent was made from Supalite 1.5 oz ripstop and had 1 x plastic S hook for hanging a torch etc and 2 x small mesh storage pockets, one at each end of the inner. The inner tent could be kept attached to the fly and the tent pitched as one or it could be detached completely and stored seperately (in it's own stuff sack) if the fly was wet from condensation or rain.
Pitching the tent is simplicity itself, peg out the fly at the center rear pegging point, insert the main pole, insert the short cross pole, raise the tent by pulling the center front pegging point/points (2 on the EB, 1 on the standard model) and place the remaining 6 pegs (4 if you don't use the pole end pegging points) I had my current one pitched yesterday and with none of the guys used and no pegs at the pole ends it was rock solid compared to my current solo tent, the TN Laser.
Pitched beside the Laser the Phreeranger looks taller but shorter and narrower, however there isn't much difference in inner tent length as the Phreeranger is mainly square ended unlike the Laser which runs to a point, also the inner tent on the Laser sits well back from the fly so is shorter than it appears from the outside. With regard to the width of the inner the Phreeranger is much wider, 2 x standard rectangular sleeping mats easily fit side by side, the Laser however can't take the same 2 mats without some overlap. The Phreeranger was normally classed as a 1+ person (some catalogues mention 2) the Laser is classed as a 2 person, IMO it should be the other way around.
The porch looks quite small on the Phreeranger, even the EB model. In fact the EB porch only extends 60cm against 64cm on the standard model (according to the Phoenix catalogue) but the EB porch has a larger area. I think the Laser has a slightly wider porch however by unhooking the Phreeranger inner tent at the end attachment points and rolling it back to the center line indicated by the pole tension webbing the porch space is massive. With the inner rolled back halfway it can still hold a standard sleeping mat and while it would feel a bit cramped it's entirely possible to use the tent in this manner. The inner could of course be clipped back at the foot end only, creating porch space while still leaving plenty of inner tent space at the head end.
Porch with inner tent in normal position
Porch with inner tent hooked back at both ends in line with the pole. Still room for a full size sleeping mat.
Inner tent hooked back at the foot end with full width at head.
The poles are 8.5mm dia, the main pole has an uneven number of sections thus avoiding a join at the apex and packs down to 52cm
You could be forgiven for thinking that a 20-25 year old tent would be significantly heavier than a current tent but you'd be surprised at how little difference there actually is. I compared my old (pre '88) Phreeranger Standard with my Laser. Taking the pegs and stuff sacks out of the equation there's about 200g difference which isn't a lot really, the Phreeranger pole could easily be replaced with a more modern (lighter)one and the guylines while being pretty light 2.5mm could be replaced with 1-2mm line. Taking into consideration the advances in fabric technology, the difference in flysheet Hydrostatic head (8000mm Phreeranger/4000mm Laser), webbing rather than shockcord pegging points it's amazing that the Phreeranger is so close to the weight of the Laser. There's almost 20 years between them and to be honest I would have expected a bigger difference, I think that speaks volumes about Phoenix and their designers.
Fly, Inner & Poles. 1490g
Getting back to the Phreeranger I have now, as I mentioned it's at least 20 years old as the flysheet is untaped but it's in remarkably good condition. I've no idea of it's history but all the guylines are original complete with their alloy sliders, all the pegging points are present with no sign of damage and all but one of the guylines have their metal rings attached. The inner tent shockcord loops have lost some of their elasticity but all are present as are the plastic 'S' hooks. The stitching has stretched in a few places on the inner tent but otherwise it's undamaged, again some stretching can be seen on the flyshhet where the reinforced patches for the pegging points are stitched on. The flysheet itself is undamaged although it feels a little stiff/dry and both alloy poles are intact and undamaged with only the shockcord on the short pole no longer working.
I actually tried it out last night as I wanted to test some new gear for an upcoming trip and figured I may as well use it rather than the Laser, I mentioned that I hoped the temperature was below freezing (testing a sleeping bag and mat) but that I hoped it rained to test the Phreeranger Flysheet. I wasn't entirely serious but the temperature did drop pretty low and it did in fact rain during the night.
I'm delighted to say that I didn't experience any leaks at all although I'd still be reluctant to subject it to strong wind/driven rain given it's age. One other thing was that there was no condensation on the inner whatsoever, I've had problems with the Laser in that respect even with the fly end vents pulled right up, maybe the increased height of the Phreeranger helps prevent condensation. The only problem and one that I was aware of was that the groundsheet is no longer waterproof, however I was pleased to discover that the footprint I made for the Laser also fits the Phreeranger, I guess I just got lucky on that one. All in all pretty respectable for a 20+ year old tent.
It's a shame that such a great tent is no longer available, without altering the actual design but by simply using modern materials the Phreeranger/Phreeranger could at the very least hold it's own against the Laser/Akto etc.
As far as I'm aware AMG/Vango own the Phoenix brand name and produce Ski Gloves branded as Phoenix, who owns the rights to the actual design is a good question but whether they know it or not they're got a tent thats almost guaranteed to be successful. I know I'd buy one in a heartbeat if it was even remotely close to the RRP of a Laser/Akto, in fact if I found a new old stock Phreeranger EB for sale at less than £300 I'd buy it without a second thought.
Of course you're probably wondering why, if the Phreeranger was such a fantastic tent aren't Phoenix still around and why did I sell mine.
Good question, I can't answer the 1st save to say that a lot of good companies didn't make it and it wasn't because they weren't good at what they did.
The 2nd point, why did I sell mine? well two reasons really, when my girlfriend (now wife) started to come with me we bought a Wild Country Quasar so the Phreeranger wasn't being used much, what with a mortgage and then a daughter I drifted away from backpacking/camping generally so all my gear was packed away (the tents were always stored indoors in a cupboard loosely placed in a large box) so there seemed little need to keep them all. I kept the Quasar and sold the Phreeranger which still had all it's pegs, stuff sacks, instructions and even swing tags, was totally unmarked inside, outside and underneath (I always used a footprint made from a survival bag)
How much did I sell it for?
£50.99 and £8.50 postage.
I mentioned in a previous post that when looking for a solo tent I'd always considered a Saunders Spacepacker but for a variety of reasons always opted for something else, maybe I should just buy a Spacepacker now, a kind of salute to another great tent that has stood the test of time simply because they got it right 1st time, I wonder how many of todays wonder tents will have come and gone before the Spacepacker needs a redesign? plenty I'd guess.
Contentment is Wealth.
Tuesday, 21 April 2009
Pacific Outdoor Ether Thermo 6, Ajungilak Air Pillow
I bought an Ether Thermo 6 after coming back from my last trip as I wanted sleeping mat that was full length, reasonably light, had a small packed size and was suitable for winter use. The Ether Thermo 6 has a synthetic fill and is rated as 3 season but I reasoned that as I was unlikely to use it in conditions that would be considered 4 season in the USA where the mat is made it should fit the bill. Looking at the Pacific Outdoor website it seems the ET6 comes in 3 lengths, Long 198x51x6 @ 675g, Regular 183x51x6 @ 623g and compact 122x51x6 @ 416g. I ordered a Regular from Raw Outdoors, the only option available but when it arrived it was a Long, not sure how that happened but in any case it weighed less than the list stated at 639g.
It takes a fair few blows to inflate, I can see the attraction on mats with a pump built in and when fully inflated looks pretty long and narrow, apart frok the fact that it is long and narrow the tapered end makes it look longer than it is (I think)
It seems comfortable enough although needless to say if you lean on you're elbow it doesn't offer much if any support. It came with a stuff sack and a repair kit which lives in a pocket at the base of the stuff sack. The stuff sack is pretty big and it was easy enough to get the mat back into the plastic sleeve type packaging that it came in even though the plastic sleeve is much smaller diameter than the stuff sack. I found that it was better to fold and roll at the end rather than roll from the beginning. I folded the outside 2 chambers on both side into the middle then folded it in half tucking the tail into the pocket formed by folding the sides in. I then kept folding in half.
I tried it out last night and I'm not sure yet whether I like it or not. It's really narrow and it feels like always about to roll off the edge. It feels warm enough with no noticable cold from the ground. I'll try it again tonight as my shoulder was pretty painful last night which made it difficult to get comfortable. I was using a Snugpac Premier 1 sleeping bag but felt cold so resorted to long johns and L/S thermal top, I didn't have any trouble getting to sleep but I did waken a few times, I guess it's still too early for the Premier 1 but I was in TK Max today and picked up a Trekmates microfleece mummy shaped liner for £10 which I'll add tonight.
The other item I wanted to try was the Ajungilak Air Pillow. I'd heard good reports about them so when I saw one in Blacks in Fort William I bought it. Now it looked really compact but for some reason I assumed it was the self inflating type, I'd bought some of those from Lidl for car camping so I was a bit dissapointed to find that I'd paid £14.99 for a plactic bag in a fleece cover (that may have coloured my judgement slightly) In any case I inflated it but found that the stopper pops out very easily, you'd think they could have used a safety type given the not exactly bargin price. I'm not keen on the simple blow up type of air pillow, I always find they're to hard or something regardless of how little air you put in, the foam filled type are much better IMO. The other thing I noticed was that they're noisy. Having said all that I wasn't kept awake by it and it is lighter and more compact than my Lidl self inflate pillow, on the other hand my Montane Flux in a stuff sack works just as well if not better.
So all in all, 5/10 so far for the Ether Thermo 6, another night's use might see that score improve. I won't score the Ajungilak Air Pillow, I wouldn't have bought it if I'd known it wasn't self inflate but the fact that it's a simple blow up and has a dodgy stopper makes me think that it's a bit expensive at £14.99, of course for anyone who finds it comfortable it is quite light and compact.
The sleeping bag is a PHD Minim 500
Monday, 20 April 2009
Terra Nova Laser Modifications
I made a few modification to my Laser, some to suit my needs and make things work a bit easier and some out of nescessity. Some of the mods were based on or directly copied from Blogpackinglight and some just general things that I wanted to do.
The 1st thing I did was to change the strut guys to V configuration and add guy line to the tabs already provided at each end. I bought the red ZeRo+ guyline from Team IO as I mentioned previously. I also doubled up on the pole guys using the guyline I'd removed from the support strut guys.
I made up a peg set that I think will provide a more versatile solution than the supplied ti wire skewers. I ended up with 6 Camcleat Y's, 6 Blacks Alloy Skewers and 4 Vargo Nails. I won't bother with the supplied pegs.
In addition I made a footprint from PU coated Ripstop which I bought from Point North I actually made it the day before I left on my last trip so the measurments aren't as accurate as I would have liked, the half porch section is a bit too wide but I can fix that. I might sew on a piece to create a small pouch which I can use as a peg bag.
I also sewed on 2 hanging loops on the inner made from plain black dressmaking ribbon to allow me to hang my (modified and lighter, 67g) Osram Dot-it LED tent light.
That covered the mods that were done only to make life easier. However I noticed on Saturday when sorting gear for another trip that the cordlock which is used to tension the pole hood was no longer holding, closer inspection revealed that it had worn quite badly.
I posted a warning on Outdoors Magic and have now adopted yet another idea from Blogpackinglight, linelocks to tension the hood. Unfortunately it looks as though the small webbing loop that held the cordlock in place and through which I now have to run the cord is starting to wear (the one on the opposite side is wider and looks stronger) so I have come up with 3 methods to attach the hood tension cords that should be stronger than the loop. I can either sew the Dogclip or D ring to the pole webbing or put an eyelet through the middle of the piece of webbing with 2 D rings and simply attach that to the pole underneath the locating tab.
One final mod that I want to make is to attach an additional shockcord loop to each of the corner flysheet pegging loops and then use glove clips on the inner tent shockcord to make it easier to unhook the inner/keep the inner attached when packed.
So far the modifications/additions have resulted in my Laser weighing in at,
Fly, Inner, Poles = 1348
Pegs = 251
Footprint = 184
Total = 1783
All in all the tent is fine, certainly the best compromise I could find at the time. Of the others the Big Agnes Copperspur UL1 looks interesting and the Saunders Spackpacker has always been on my shortlist but never quite made it. Last time (91-92)it lost out to a Phoenix Phreeranger EB, that in my opinion was one of the best solo tents ever made, unfortunately someone (Vango/AMG?) is sitting on the rights/design with no idea of what they have. I recently aquired an old (pre taped seams) Phreeranger and if you take pegs/stuff sacks alone out of the equation it's within 200g of my Laser 1487g - 1286g.
Not too bad for a 20-25 year old tent. I hope TN aren't feeling too smug............. ;-)
Saturday, 11 April 2009
Classic Simplicity
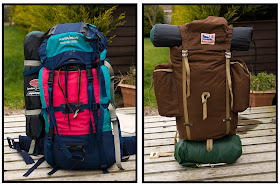
I'd been after an external framed pack for some time and eventually picked this one up. I never had one before but I packed it up with everything that I'd carried in my Karrimor Condor 65L and to be honest it was surprisingly comfortable. The main problem is the hip belt insofar as it's really only to stabilize the pack rather than be load bearing. I'm pretty sure they must have made external frame packs with a load bearing hip belt as we have a Karrimor Papoose that we used to carry our daughter and it has a padded shaped belt. Unfortunately while I could remove it I can't get it to fit the other pack.
Frame type aside the thing that I like about the old Karrimor is the simplicity of design, one compartment, 2 side pockets and a lid pocket. In addition it's blessedly free from additional straps/flaps and other IMO unnecessary add-ons. There is no way to reduce the size of the pack as it has no compression straps but to be honest does anyone actually use a 65L + pack compressed to 20L so that they can use it as a day pack? I doubt it.
I've looked at plenty of packs recently and it seems that you can get a very simple pack but with little more than a foam pad as a 'frame' or you get a pack that has any number of add-ons which to be honest must practically double the overall weight.
The closest I've seen is from the Golite range, something like the GoLite 2009 Quest 72L or GoLite Pinnacle 72L or from OMM in the shape of the OMM Mountain Mover
The problem as I see it is that they all have a 'Frame' based around a foam pad, with the old external packs there's a minimal amount of pack/back contact and as such a reduction in sweaty back syndrome. As far as I know until recently the arctic troop RM still used external frame packs for both their load carrying ability and the improved airflow, in fact they may well still use them.
So the question is will any of the mainstream companies ever go back to a modernised external frame, minimalist design pack or will it be left to the UL movers in the USA to think outside the box. For all the talk about a lightweight revolution theres little point in making the actual pack from ultralight material and then adding the same weight again through the addition of foam backpads, compression straps, a multitude of internal and external pockets clips and other paraphernalia.
What I'd like to see is a basic lightweight single compartment bag with tunnelled side pockets that poles could be slipped behind, an ultralight external spar frame (Carbon/Aluminium) load bearing hipbelt and unpadded tension adjustable mesh back pads similar to the Vango Air Canyon packs from a few years ago but without the unnecessary moulded plastic frame (the biggest problem with them was that the moulded plastic frame curve reduced the internal space of the pack)
Thursday, 9 April 2009
Trip to the Cairngorms
Just back last night after a few days in Scotland, my plan was to do a bit of walking/camping in the Cairngorms coming in from the Linn of Dee. I'd already booked the ferry so even though the weather forecast wasn't promising I had little choice but go. The trip didn't exactly go according to plan, for one thing I decided to leave my ice axe, crampons and stiffer boots in the car to save a bit of weight (my pack was already around 19kg what with gear that isn't exactly lightweight, 4 days food and around 1.5kg of camera and lens) I didn't really have any definite plans preferring to be flexible but with the benefit of hindsight I was perhaps a bit too flexible as I wandered around a lot and changed my mind too often.
In any case it was an opportunity to try some new gear and some older gear in a different environment. It was my 1st real try with my new Terra Nova Laser so I was looking forward to seeing how I managed, also I'd opted to take an EK Kombi as my sole means of cooking, I'd brought my C-3 mini gas stove but decided to leave it in the car reasoning that in the absence of suitable fuel for the wood stove I could rely on the back-up alcohol burner. Most of my main meals were made up of a variety of supermarket dehydrated meals but I did take a Wayfarer and a Mountain House main meal for variety.
My kit list was as follows,
Shelter
Terra Nova Laser
In addition to the 12 supplied pegs I took
4 x Vargo nails
10 x Camcleat Y's
That added 250g
Plus a Footprint at 194g
Cooking Gear
EK Kombi c/w Meths burner
Alpkit Mitymug
Tibetan ti 450ml mug
Plastic Mug
Tibetan ti Folding Spork
GSI Long Handled Spoon
Mora Carbon knife c/w flint
Cosy for Ziplock Bags
2 x 250ml Bottles of Meths
6 x 14g Esbit Tabs
Sleeping Gear
Field & Trek Moonlite Down Bag (bit of a misnomer as it weighs over 2kg)
Highlander Thermalite Compact Self Inflating Mat (another misnomer as it's neither compact or lite, just over 1kg)
Water carrying
Aquagear Bottle
L Ortlieb Bag (only filled prior to setting up camp)
Food
I made up 4 foodpacks which consisted more or less of the following,
Breakfast - Muesli, Coffee
Lunch - Fruit/Cereal Bar, Mini Smoked Cheese, Garibaldi biscuits, Cuppa-soup*, Instant Mocha/Cappuccino*, Chocolate (Mars)
Main Meal - Cuppa Soup, Cup Pasta, Mrs Mathesons Smoked sausage, Coffee.
Night Snacks - Cuppa Soup, Coffee + whatever was left from Lunch/Main Meal.
I tend to drink a lot of coffee and eat constantly when I'm stuck in the tent with nothing to do so everything was used up, in fact the Mountain House Rice and Chili was so utterly disgusting that I couldn't eat it, that resulted in using additional fuel (fortunately using the wood stove at that time) and a raid on the next days meal. I'm definitely going for a dehydrator, one from Westfalia at £26 will be fine. I don't expect to see a massive weight saving as the only stuff that wasn't dehydrated was the sausage but at least I can make something I like in the quantities I need.
Lighting
Osram Dot-it LED light
Energizer Headlight
Clothing Carried
Gaiters
Shell Gloves
Lowe Mountain Cap
Goretex jacket
Light Trespass Overtrousers
Montane Flux
Spare L/S Sub Zero Thermal
Pair light Fleece Trouser Liners
Spare pair short Socks
Misc
1st Aid Kit
Trowel
Maps/Compass/GPS
Repair kit
Wash Kit
Panasonic SDR-S7 Cardcam + 2 spare batteries (carried in a CCS Belt Pouch)
Olympus E-3 & 14-54mm lens + 2 spare batteries & spare CF Cards (carried in a CCS Pouch clipped to the rucksack shoulder straps)
Lens Pens/cloth
Pair Highlander Trekking Poles
German Army Penknife
Clothing Worn
Chocolate Fish Merino L/S Base layer
Mountain Equipment Liskamm Trousers
Fleece Zip Neck Top (£2 at Primark)
Tacgear Windshirt
Fleece Hat
Salomon Socks
Meindl Borneo Boots
I used a Karrimor Condor 65l SA rucksac to carry it all.
I think the only thing apart from the 1st aid kit that didn't get used was the spare base layer top, the fleece trouser liners I wore once at night. Of the other stuff I could probably manage without,
Folding Spork
Plastic Mug
Mora Knife (retaining the Flint)
That would save 172g. I won't take the TN wire skewers again, they're light but compromised, instead I'd take 6 Camcleat Y's, 4 Vargo Nails and 6 Blacks Alloy Skewers for a total weight of 249g. As it turned out I was glad to have the TN Wires, I accidental left the EK Kombi Windshield support rods behind after stopping for lunch on day 1 and had to use 2 TN Wires that evening, actually picked the 2 rods up again on the way back!!
Of the rest I'm not sure where to make a saving, the sleeping bag is sorted as I'd already ordered a PHD bag at around 900g, a saving of over 1kg, I should and probably would have taken a smaller camera but for the fact that my wife had taken it with her to Spain. That would save 889g (E-3 + Lens 1418g, C5050 529g) As for the sleeping mat, well I could have taken an Alpkit Wee Airic or gone retro with a Karrimat Extreme strapped to the outside which incidentally I had to do with the Thermalite. Either option should save about 500g although I'm considering a Pacific Outdoors Ether Thermo 6 at 623g. It seems pointless saving 100g but all the 100g here and there add up and at 10st I can't afford to carry any unnecessary weight.
Although the trip was a bit shambolic due to poor planning and indecision everything worked pretty much as it should, the Kombi performed flawlessly, used 3 times in wood stove configuration, once with an Esbit tab simply to see how it performed and all cooking that was done inside the porch was done using the meths back-up as a stand alone stove. I had no problems with stability as a skewer through the baseplate kept it rock solid.
The Laser was mainly fine but I have to say there are a few areas where I feel that a compromise was accepted in an attempt to save a few spec sheet grams. It seems to be extremely prone to condensation, even with the ends vents hiked up, that wouldn't necessarily be a major issue if the inner and fly could be separated easily but they can't so by the time it was packed and bagged the entire tent, inner and outer was saturated. I have to say that once pitched it does offer a comfortable amount of space for 1 especially if you're sitting out bad weather as I did in Glen Nevis when it rained constantly from arrival late afternoon Tuesday until I left late morning Wednesday. I'll post a few thoughts on the Laser comparing it with the Phoenix Phreeranger/Phreeranger EB but that'll keep for another time.
Of the clothing I used everything was fine, the Liskamm's were warm, pretty windproof and water resistant and dried quickly, the Montane Flux was fine but I expected that as I'd almost worn it out when I got it, the Tacgear windshirt did what it was supposed to do and was pretty cheap, my fleece cost £4 from Primark (zip neck, shockcorded hem, elasticated cuffs, 2 handwarmer pockets) and did what a fleece is supposed to do and the Chocolate Fish Merino top worked away in the background keeping me dry, warm and socially acceptable.
The biggest problem I had was my rucksack, for some reason I couldn't get it comfortable, it seemed to press on the belt of my trousers or cut into my shoulders, never had a problem with it before, the only thing I can think of is that since I last carried that amount of weight in it I've had a bad RTA on a motorbike, a few broken ribs and a broken shoulder blade among other things resulted in my right shoulder being 1-2" lower than the left, either that or my wife is right, I've just had too many birthdays :-)
All in all not exactly how I imagined it but I'm looking forward to a return visit with a lighter load and some idea of where I'm going. Perhaps the weather will be a bit more predictable next time!!