
I mentioned previously that having tried to make a hammock Under Quilt by converting a regular sleeping bag that I wanted to try to make one from scratch. I’d decided that I’d use easily available materials and go synthetic rather than down for simplicity and low cost but the only plans I could come up with were ones to make an asymmetric quilt designed for a Hennessey hammock. The plans were made available by the guy who originally made the Kick Ass Quilts Potomac but as my hammock is a regular gathered end hammock I was doubtful that it would fit. In the end I decided to go ahead anyway as Ralph has a Hennessey hammock so it would fit his and if it did work with mine I could make another.
The only fabric that I could get locally was regular polyester (used for dress lining etc) and cheap unbranded synthetic insulation. I bought 4 meters each of black and grey polyester and 4 meters of insulation in 2 different weights together with some Grosgrain ribbon, shock cord and cord locks. I could only get 2mm shock cord which is a bit thin and the cord locks which had to have tape loops came from an ebay seller in Hong Kong, all in it came to just under £50 and I hoped to make 2 quilts.
I had to make a pattern which was drawn out on stuff I’d picked up last year to make a tent footprint. The quilt is asymmetric and tapers at each end with the foot end being slightly narrower than the head end, in addition there were 2 darts, one near the foot on one side and one at the head on the other.

Pattern Laid out Ready to Pin to the fabric
The 1st thing was to lay up the fabric, (black for the inner, towards the hammock, grey for the outer) pin on the pattern and cut the 2 pieces out. With the inner and outer cut I made up the 6 drawcord tunnels, one for each end and 2 for each side (one long, one short). The corners of the inner were reinforced by stitching on pieces of fabric which extended along the sides/ends by about 4 inches.

Reinforcing Patches Pinned to the inside of the Inner Shell

The next step was to sew the reinforcing patches to the inside of the inner part, with that done I sewed the drawcord tunnels to the outside of the inner part.
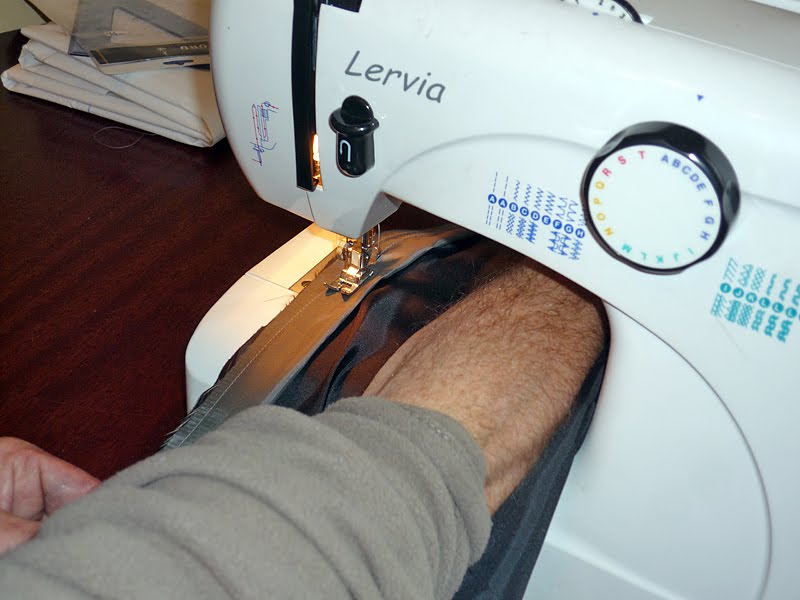
Attaching the Drawcord Tunnels

I made a bit of a mistake here as I made the drawcord tunnels too long which left me with very little room to attach the Grosgrain loops. It was just possible to sew on the loops but at the corners opposite the plain loops I needed to sew on 2 cord locks attached to Grosgrain, I simply didn’t have enough working space here so decided to leave them until the end and simply sew them on to the outside once everything else was sewn up. To finish the inner I simply sewed up the darts on each side which helps form the quilt aroud the hammock.
Most of the work is done on the inner shell of the quilt and with it finished I used the outer shell as a pattern to cut the insulation. I cut the insulation a few centimetres bigger than the fabric as the plans suggested that it would stop the insulation curling up around the foot of the sewing machine when the inner, outer and insulation were sewn together. Once the insulation was cut to size I looslely hand sewed the darts on the insulation and machine sewed the darts on the outer shell.

Cutting the Insulation using the Outer Shell as a Pattern

Assistant Checking Comfort Rating
With all the parts finished I was ready to attempt the step I was least looking forward to, sewing the 3 layers together. The bit that looked like causing the biggest problem was getting the seam in the right place to ensure the drawcord tunnels didn’t end up too narrow yet to ensure that once turned inside out (actually right side out as it’s sewn together with the right side facing in) that the stitching attaching the drawcord tunnels to the inner shell weren’t showing.

Insulation, Inner Shell and Outer Shell Pinned for Sewing
I spent quite a bit of time pining everything together, constantly checking that the parts that I couldn’t actually see once pinned were all in the correct position. In the end sewing it all together wasn’t too bad although unfortunately I did manage to let some of the inside drawcord tunnels stitching show along one side, it doesn’t affect the performance of the quilt but it doesn’t look very nice.
I’d left part of the foot end open so that I could turn everything right way out and I have to admit I was pretty happy with it all things considered once I’d laid it out right way out. With that done the final stitching was to fold in the opening at the foot, sew it up and sew on the double captive cord locks at opposite corners.

All Sewn Up Ready for the Shockcords and Attachment Cords

625g, Just Needs A Stuff Sack.
Once that was done I added the shock cord which gathers the quilt around the hammock and fitted the heavier shock cords that attach the quilt to the hammock. I’ve tried it on my hammock and while it would work it isn’t ideal but I’m curious to see how it looks on a Hennessey, for what it‘s worth it ended up weighing 625g. The only thing left to do is sew up a stuff sack and pass it on to Ralph.
It wasn’t too difficult in the end and while I made a few mistakes I’ve learned a bit so I’d change a few things from a construction point of view. What I need to do now is come up with a design that suits my hammock better, a rectangular quilt would work ok, the one I made from the sleeping bag is rectangular, but it seems to me that there’s a lot of excess weight at the ends where everything is gathered up so I’ll probably come up with some kind of tapered shape, slightly narrower at the foot and slightly shorter than the KAQ Potomac. The shorter and narrower I can manage with the lighter it’ll end up and I’d like to get it down to a max of 500g.

Darts Allowing Quilt to Form around Hammock

Packed, PU Coated Ripstop Stuff Sack, A Compression Strap Would reduce the Packed length by about 1/3rd
Brilliant!! You got more patience than me with such things, Mac
ReplyDelete